Running a validator client on a Raspberry Pi
Note (2025): This guide is heavily outdated. Ethereum underwent “The Merge” in September 2022, replacing Proof of Work with Proof of Stake and unifying the execution and consensus layers. OpenEthereum has been discontinued, the Medalla and Goerli testnets no longer exist, and the beacon chain / Eth1 terminology has been superseded. Modern staking setups look quite different from what is described here. The general idea of using a Raspberry Pi as an HSM for validator keys remains interesting, but the specific instructions should not be followed.
Running a Validator Client on a Raspberry Pi
I assume familiarity with Staking on Eth2.0 in general.
This is a quick manual on how to run the Validator Client, and only the Validator client, on a Raspberry Pi. I have decided to run my beacon node on a separate machine with more resources. It is probably possible (possibly after more optimizations) to run your whole staking operations on a Raspberry Pi, which would be a good idea for cost/energy efficiency – but at this point, I am much more concerned about security. The idea here is to effectively use the Raspberry Pi as a simple “Hardware Security Module” or HSM: It acts to protect the keys and contains the validator slashing protection.
Advantages of this setup
- Better protection of validator keys than at-home staking with single node – the machine containing the staking keys does not have a direct internet connection
- Beacon node is not running on resource-constrained Raspberry Pi, so should run safely even under non-optimal conditions where the Raspberry Pi might struggle, e.g. very high number of validators or long periods of non-finality
What this setup does not cover
- Optimized for security, not cost (double hardware, higher electricity consumption)
- Not optimized for liveness. An additional point of failure by relying on two machines for staking
The Raspberry Pi in this configuration can be seen as a kind of Hardware Security Module or HSM. Until dedicated HSMs for staking become available, this is my suggestion on how to reach nearly equivalent.
As there is no mainnet, I will describe how to run on the Medalla testnet. Once I update my setup for mainnet launch I will update this guide.
Diagram
As an illustration, here is a diagram of the node configuration
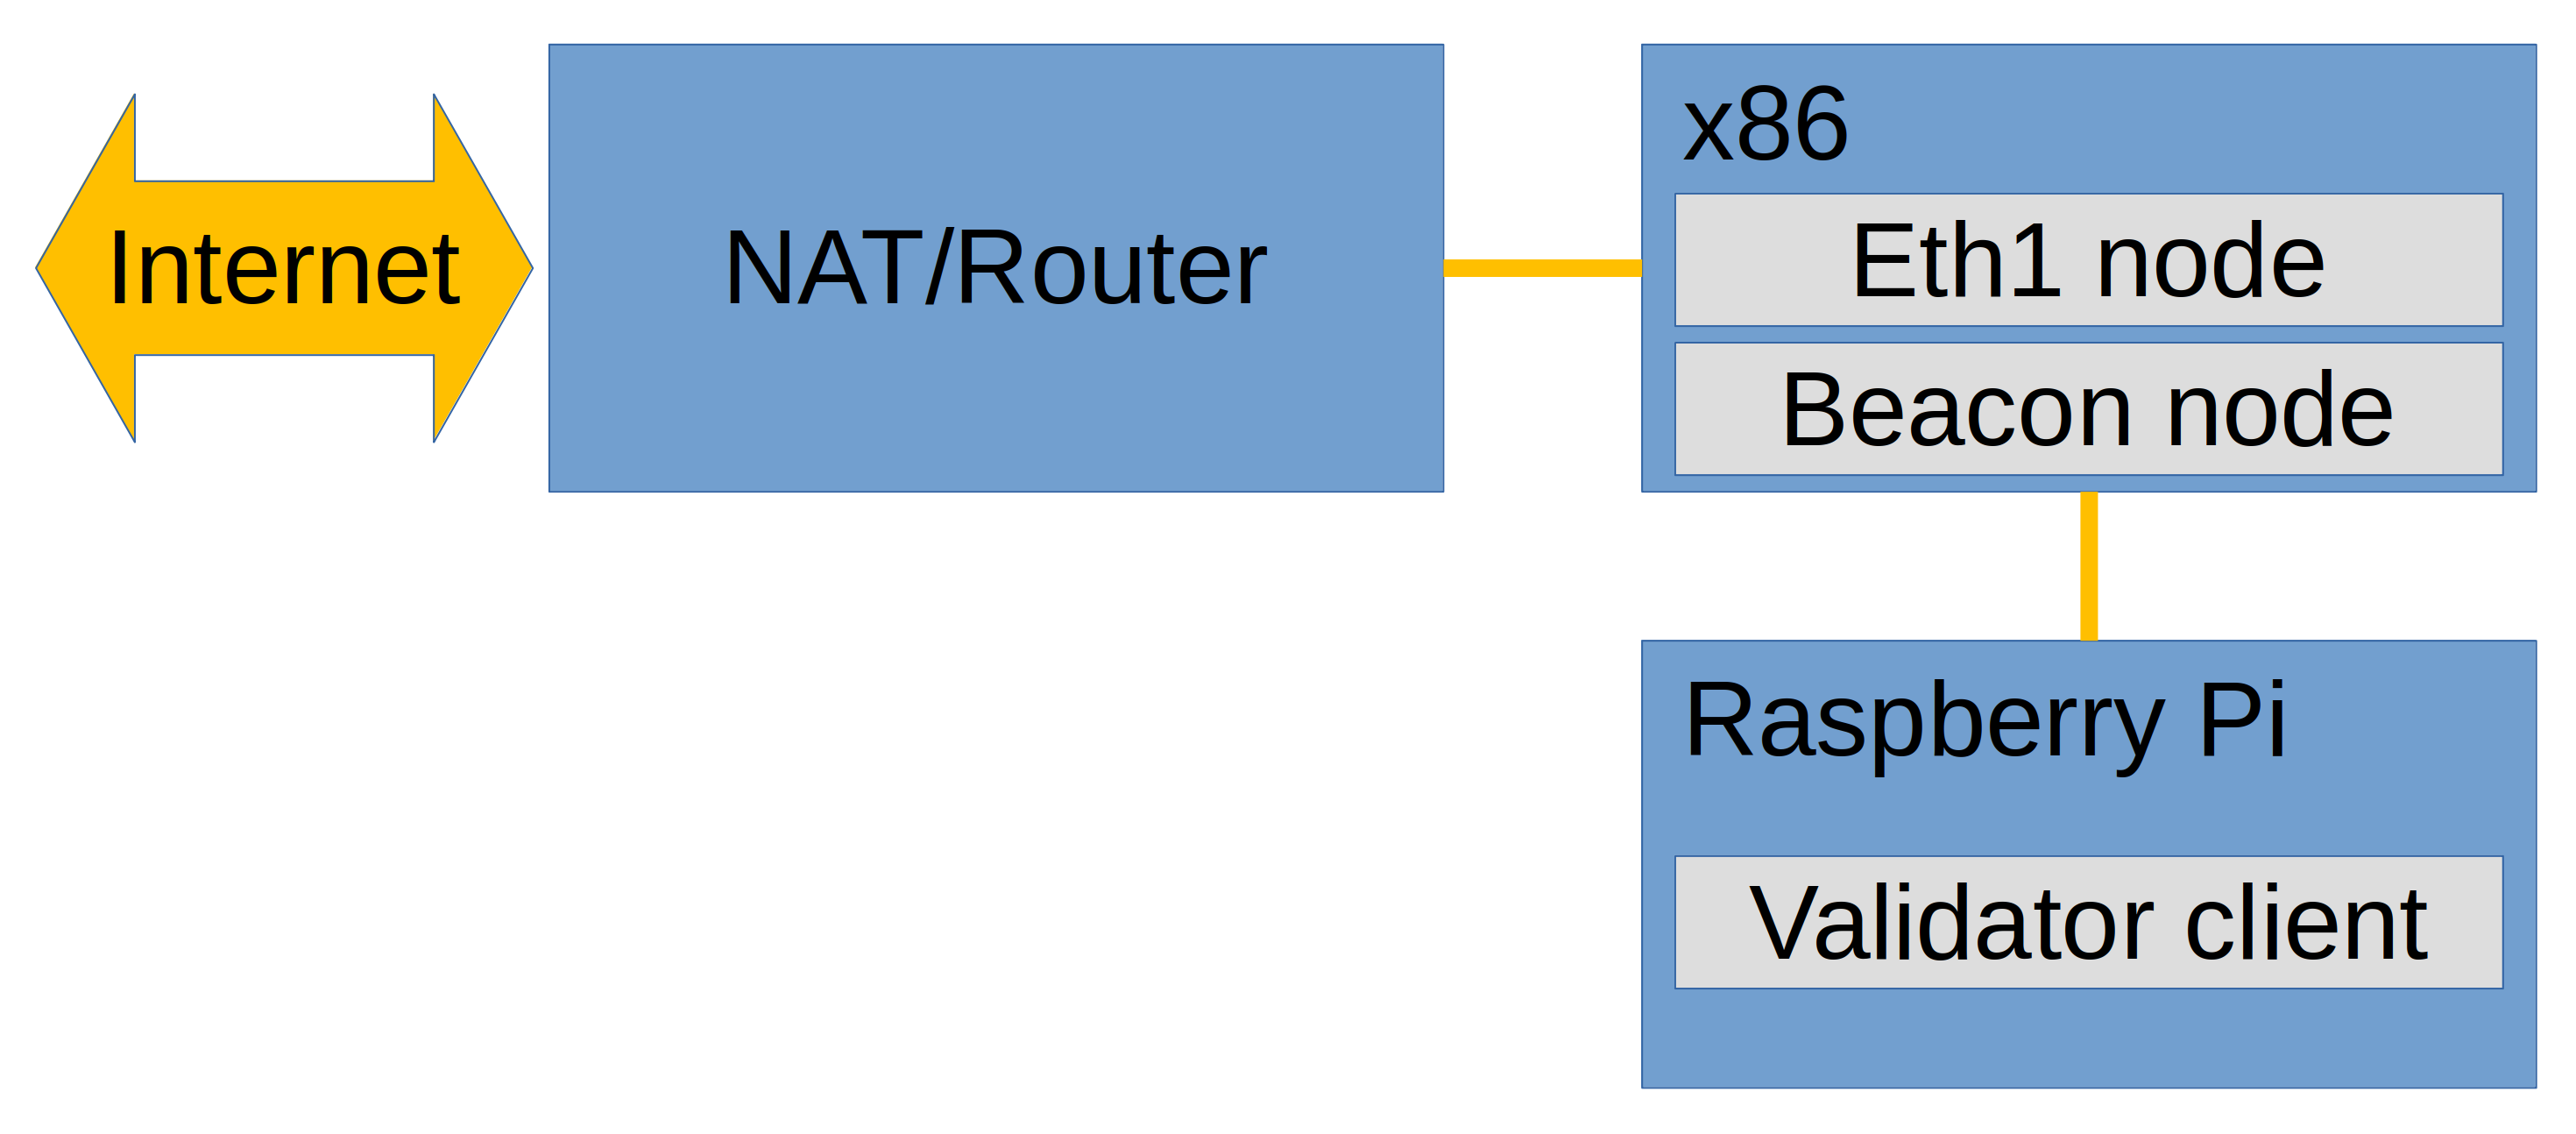
Hardware
To run the Validator Client, I use a Raspberry Pi 4 4GB. If you want to compile on your Raspberry Pi, I recommend 8GB (at the time of writing, the lighthouse build did not complete on 4GB, but I think it would on 8GB). What you need in addition:
- A USB-C charger
- Micro-SD card – I recommend not skimping on this one as cheap cards may be unreliable, especially after many write operations. I am using a Samsung EVO 32 GB
- Raspberry Pi case – since I don’t like to have a fan, I got the “GeekPi Argon NEO Aluminum Case” which is fanless
- Another machine to run the beacon node. Mine has 2 Ethernet ports, of which I use 1 to connect to the router and one for the Raspberry Pi, so the Raspberry Pi is not visible on the local network at all
Installation
First, we need an operating system on the Raspberry Pi. I use Ubuntu 20.04 LTS Server, as I’m most familiar with Ubuntu. I will give a short summary of the installation which should be enough for technical user, otherwise you can find a manual on how to install it here. The installation is quite easy even without a display attached:
- Use rpi-imager to install an image of Ubuntu 20.04 LTS Server (64 bit) on your MicroSD card
- Use the “system-boot” partition to configure your Pi for the first launch. In order to run Headless, this is essential: You want to be able to SSH into the Pi. In my case, I first configured it to my home network because I want to be able to download all updates before I cut it off the internet. In order to connect to your wifi, edit the
network-configfile to add your SSID and password:wifis: wlan0: dhcp4: true optional: true access-points: <wifi network name>: password: "<wifi password>" - Now you can insert the MicroSD card into the Raspberry Pi and boot the Pi by attaching USB C power
- Find out the IP address (Your router interface might have a list of connected devices. Otherwise a quick
nmap 192.168.0.0/24will also do the trick) - Log in via SSH using the credentials
ubuntu/ubuntu. You will be asked to change password - After this, I decided to create a user in my own name using
adduser [username]. Make sure to add your user to the sudo group usingaddgroup [username] sudo. This step can be skipped if you just want to use theubuntuuser - Bring your system up to date using
sudo apt update && sudo apt upgrade
Now it’s time to configure the Pi for a static network connection. Edit /etc/netplan/50-cloud-init.yaml to remove the wifi (we don’t want the Pi to be in the local network on production) and add a static Ethernet address:
 network:
    version: 2
    ethernets:
        eth0:
            dhcp4: false
            optional: true
            addresses:
              - 192.168.1.2/24
Disable the automatic cloud configuration by creating the file /etc/cloud/cloud.cfg.d/99-disable-network-config.cfg and adding the line
network: {config: disabled}
Configure the beacon node machine’s main machine second Ethernet port to a static 192.168.1.1/24 address. You can now connect the Pi and the main machine via ssh to 192.168.1.2.
Cross compile the lighthouse client
I want to run the lighthouse client because it has performed well in testnets so far and seems to have suffered few critical bugs compared to other clients. Unfortunately, lighthouse does not come with a compile target just for the Validator Client, which is the part that I want to run on my Pi – you need to build everything. I couldn’t get that to complete on my 4GB Pi – it may be possible (but likely still slow) on an 8GB Pi. The easier way is to cross compile. Here is how to do this on ubuntu:
mkdir ~/ethereum
cd ~/ethereum
curl https://sh.rustup.rs -sSf | sh
git clone https://github.com/sigp/lighthouse
cd lighthouse
cargo install cross
make build-aarch64-portable
Via scp you can copy the resulting binaries to the raspberry Pi:
scp -r target/aarch64-unknown-linux-gnu/release 192.168.1.2:~/lighthouse
Install your validator keys to ~/.lighthouse/medalla/validators. Optionally you can add the passwords to the validator keystores to ~/.lighthouse/medalla/secrets. I prefer not to do this, so that if someone happened to take the Pi from my house without maintaining continuous power supply, they would not have access to the validator keys. However, this means whenever the Pi reboots, I have to log in to enter the password; it’s a tradeoff depending on how easily you can do this (probably not ideal if you are planning long trips without internet connection).
If you are planning to store the keystore passwords, you can create a systemd service to launch the VC automatically on boot. Create /etc/systemd/system/lighthousevc.service:
[Unit]
After=network.service

[Service]
ExecStart=/home/[username]/ethereum/lighthouse/target/release/lighthouse vc --beacon-node http://192.168.1.1:5052
User=[username]

[Install]
WantedBy=default.target
Otherwise, I recommend running it inside a screen session to be able to keep it running when you close the ssh session:
screen /home/[username]/ethereum/lighthouse/target/release/lighthouse vc --beacon-node http://192.168.1.1:5052
Compiling Lighthouse and OpenEthereum for the Beacon node
These instructions are if you are also using Ubuntu 20.04 on your main (beacon chain) machine. It is possible to run this setup with a different operating system.
You need to install openethereum (or another Mainnet ethereum client, such as Geth). Download and install it into ~/ethereum/openethereum.
Build the lighthouse client for the host system in order to be able to run the beacon node:
cd ~/ethereum/lighthouse/
make
First launch
We are now ready to run the Eth1 and the Beacon node: To start the Eth1 node, run
~/ethereum/openethereum/openethereum --chain goerli --jsonrpc-interface=all
(This is for the Goerli testnet, required for running on Medalla – change this for mainnet)
To start the Beacon node, in another terminal, run
~/ethereum/lighthouse/target/release/lighthouse bn --testnet medalla --http-port 5052 --eth1-endpoint http://localhost:8545 --http-address 192.168.1.1 --http
Both the Eth1 and Beacon node should start syncing. Note that this can take a long time – many hours on testnets and several days for an Eth1 mainnet nodes.
Installing the beacon node as daemons
To launch the Eth1 and beacon nodes automatically as daemons, we can create systemd files:
For Openethereum: /etc/systemd/system/openethereum.service
[Unit]
After=network.service

[Service]
ExecStart=/home/[username]/ethereum/openethereum/openethereum --chain goerli --jsonrpc-interface=all
User=[username]

[Install]
WantedBy=default.target
For the Beacon node service: /etc/systemd/system/lighthouse.service
[Unit]
After=network.service

[Service]
ExecStart=/home/[username]/ethereum/lighthouse/target/release/lighthouse bn --http-port 5052 --eth1-endpoint http://localhost:8545 --http-address 192.168.1.1 --http
User=[username]

[Install]
WantedBy=default.target
These services now be started and stopped using the nomal systemd interface using sudo service openethereum [start/stop] and sudo service lighthouse [start/stop].
Synchronize the Raspberry Pi’s clock
Note that the Raspberry Pi has no battery to keep a time when it’s shut down, and it also isn’t connected to the Internet so Ubuntu’s default mechanism to synchronize the time will not work. So we will need to have an NTP server on our beacon node machine to keep it synced. On the beacon chain machine, install the ntp server:
sudo apt install ntp
sudo service ntp start
This is also a good time to adjust your NTP settings. Keeping your time well in sync is essential as a staker. There are several attacks via time services, and unfortunately rogue NTP servers cannot be ruled out. Our best defence against these attacks is avoiding all large time adjustments. NTP has a nice parameter, and you should add this to your /etc/ntp.conf file to stop all adjustments of more than 5 seconds (this will mean if your clock drifts by more than 5s, you have to set it manually – this should never really happen unless you have a long power outage).
tinker panic 5
Now on the Pi, edit /etc/systemd/timesyncd.conf to connect to the other machine’s NTP server:
[Time]
NTP=192.168.1.1
Optional: Harden your Pi using ufw
You can use a firewall to only allow the ssh port on the Pi. Note the configuration I have given will already do that, however if you are planning to use your Pi for anything else, this might be an extra measure to prevent accidental opening of additional ports.
sudo apt-get install ufw
sudo ufw default deny incoming
sudo ufw default allow outgoing
sudo ufw allow ssh
sudo ufw enable
Future work
- Adapt this guide for mainnet where necessary
- Simplify updating ubuntu and lighthouse node on the Pi